
Create A CRM Specific Contract
Integration Toolkit > Create A CRM Specific Contract
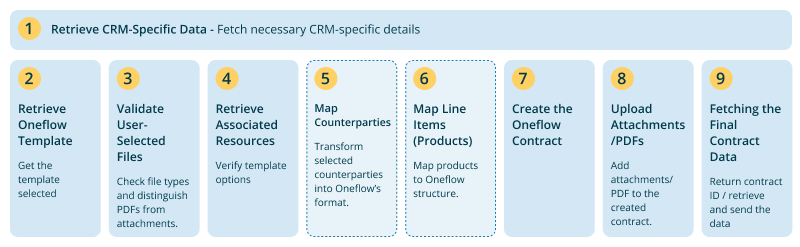
This section guides you on how to develop the Oneflow contract creation backend logic within the Oneflow Integration in your CRM system. You can allow your users to create contracts from any object in your system, such as Opportunities, Deals, Accounts, Contacts, or any custom object.
In the Get CRM Specific Data To Create A Contract section, you learned how to retrieve the necessary CRM-specific information to create a contract. You should pass this data to the Contract Create function. Additionally, it is essential to know which object your end user intends to use to create the contract.
FUNCTION CreateContract
    INPUT: user (includes API token and email), account_connection, body (contract details)
    OUTPUT: contract_id (ID of the created contract)

    BEGIN
        # Step 1: Extract required data from the input body
        SET template_id TO value of 'source_id' in body
        SET workspace_id TO value of 'workspace_id' in body
        SET object_id TO value of 'object_id' in body
        SET object_type TO value of 'object_type' in body
        SET participants TO value of 'participants' in body
        SET contract_name TO value of 'contract_name' in body
        SET selected_files TO value of 'files' in body, OR an empty dictionary if 'files' does not exist

        # Step 2: Retrieve the template by its ID for validation purposes
        SET source_template TO result of calling GetTemplateById USING template_id AND user

        # Step 3: Validate selected files against available options in the template
        CALL ValidateFiles USING selected_files AND source_template

        # Step 4: Retrieve CRM resource details
        # Fetches required resource details such as line items, account ID, deal value, and currency
        # by passing account_connection, object_type, object_id, and source_template.
        SET line_items, resource_details, account_id, deal_value TO results from handling the resource
        USING account_connection, object_type, object_id, source_template

        # Step 5: Build counterparties
        SET counterparties TO an empty list
        IF participants IS NOT EMPTY THEN
            TRY
                # Constructs counterparties using account_connection, participants, and template options.
                SET counterparties TO CALL BuildCounterParties WITH account_connection, participants, AND source_template["available_options"]
            CATCH Exception
                # Handles exceptions encountered during counterparty creation.
                HANDLE exception
            END TRY
        END IF

        # Step 6: Build product groups if line items are available
        SET product_groups TO null
        IF line_items IS NOT EMPTY THEN
            TRY
                # Constructs product groups from line items based on the template structure.
                SET product_groups TO CALL BuildProductGroups WITH line_items AND source_template
            CATCH Exception
                # Handles exceptions encountered during product group creation.
                HANDLE exception
            END TRY
        END IF

        # Step 7: Create the Oneflow contract
        TRY
            # Calls the CreateOneflowContract function with all necessary parameters to create a contract.
            SET oneflow_contract TO CALL CreateOneflowContract USING template_id, workspace_id, counterparties, deal_value, contract_name, AND product_groups
        CATCH Exception
            # Handles exceptions encountered during contract creation.
            HANDLE exception
        END TRY

        # Step 8: Upload files if any are selected
        IF selected_files IS NOT EMPTY THEN
            TRY
                # Attaches the selected files to the newly created contract.
                SET contract_id TO oneflow_contract["id"]
                CALL UploadContractFiles USING user, account_connection, contract_id, selected_files
            CATCH Exception
                # Handles exceptions encountered during file upload.
                HANDLE exception
            END TRY
        END IF

        # Step 9: Return the contract ID of the created contract
        RETURN oneflow_contract["id"]
    END
Note:In this function,
template_id,workspace_id,participants,contract_name, and file details can be provided as user inputs before creating the contract, as described in the Get Data To Create A Contract and Get CRM Specific Data To Create A Contract sections.resource_idandresource_typerepresent the object (e.g., opportunity, deal, or contact) that the end user will use to create the contract.
2
Retrieve Required Parameters
Retrieve the Oneflow template selected by the user to obtain more information about the template. You can use the Get a Template by ID endpoint to fetch detailed information about the selected template.
FUNCTION GetTemplateById(template_id, user)
    # Purpose: Retrieve a template by its ID.

    # Step 1: Set up the headers for the API request
    DEFINE HEADERS
        SET "x-oneflow-api-token" IN HEADERS TO user.apiToken
        SET "x-oneflow-user-email" IN HEADERS TO user.email
        SET "Content-Type" IN HEADERS TO "application/json"

    # Step 2: Make a GET request to retrieve the template
    MAKE a GET request to URL "{host}/v1/templates/{template_id}"
        WITH verification setting from config.REQUESTS_VERIFY_CERTIFICATE
        AND headers obtained from HEADERS

    # Step 3: Check the response status code
    IF response.StatusCode EQUALS 200 THEN
        SET jsonResponse TO result of parsing response to JSON format
        RETURN jsonResponse
    ELSE
        THROW HttpResponseError

END FUNCTION
3
Validate the files selected by the user.
In the Attachments / PDFs section, you learned how to include files as user input and distinguish between extended PDFs and attachments.
FUNCTION ValidateFiles(selected_files, source_template)
    # Purpose: Validate files according to Public API rules.

    # Step 1: Extract available options from the source template
    SET available_options TO 'available_options' FROM source_template

    # Step 2: Check if an expanded PDF is present and allowed
    SET has_expanded_pdf TO True IF any file IN selected_files has 'is_expanded_pdf' as True, OTHERWISE False
    IF has_expanded_pdf AND available_options['can_receive_expanded_pdf'] IS NOT True THEN
        RAISE ConflictProblem WITH appropriate error message AND actionable instructions

    # Step 3: Check if attachments are present and allowed
    SET has_attachment TO True IF any file IN selected_files does NOT have 'is_expanded_pdf' as True, OTHERWISE False
    IF has_attachment AND available_options['can_receive_attachments'] IS NOT True THEN
        RAISE ConflictProblem WITH appropriate error message AND actionable instructions

END FUNCTION
4
Retrieve Associated Resources
When retrieving resources associated with an object, ensure you consider the available options in the source template.
For example, you can only map line items if the template can receive products. This requires at least one product group to be available in the template.
5
Map Counterparties
Map the user-selected Counterparties into the Oneflow data structure for counterparties.
FUNCTION BuildCounterParties(participants, available_options, account_connection)
    # Purpose: Build a list of counterparties by mapping participants into Oneflow's data structure.

    # Step 1: Initialize mappings for participant details
    SET contact_ids TO a list of 'contact_id' FROM participants
    # Example: contact_ids = [101, 102, 103]

    SET participant_types TO a mapping of 'contact_id' TO 'type' FROM participants (e.g., signatory, influencer, viewer)
    # Example: participant_types = {101: "signatory", 102: "viewer", 103: "influencer"}

    SET party_types TO a mapping of 'contact_id' TO 'party_type' FROM participants (e.g., company, individual)
    # Example: party_types = {101: "individual", 102: "company", 103: "individual"}

    SET contact_company_id TO a mapping of 'contact_id' TO 'company_id' FROM participants (default: None)
    # Example: contact_company_id = {101: None, 102: 1234 , 103: None}

    # Step 2: Define constants
    SET unknown_str TO "unknown"

    # Step 3: Determine preferred delivery channel, default to "email" if unknown
    SET preferred_delivery_channel TO the name of the preferred delivery channel IN available_options
    IF no preferred delivery channel IS found OR its name IS unknown_str THEN
        SET preferred_delivery_channel TO "email"

    # Step 4: Determine preferred sign method, default to "standard_esign" if unknown
    SET preferred_sign_method TO the name of the preferred sign method IN available_options
    IF no preferred sign method IS found OR its name IS unknown_str THEN
        SET preferred_sign_method TO "standard_esign"

    # Step 5: Determine preferred two-step authentication method, default to "none" if unknown
    SET preferred_two_step_auth TO the name of the preferred two-step authentication method IN available_options
    IF no preferred two-step authentication method IS found OR its name IS unknown_str THEN
        SET preferred_two_step_auth TO "none"

    # Step 6: Retrieve additional contact details for the selected participants
    # Ensure you query the relevant API or database in your system to get these details.
    SET contacts TO result of querying the system FOR contact_ids

    # Step 7: Initialize lists for companies and parties
    SET company_participants TO an empty list
    SET parties TO an empty list
    SET unique_company_ids TO an empty list

    # Step 8: Process each contact in the retrieved contacts
    FOR EACH contact IN contacts DO
        SET party_type TO party_types[contact['id']]
        SET participant_type TO participant_types[contact['id']]

        # Step 8.1: Create participant details
        SET participant TO:
        {
            "_permissions": { "contract:update": participant_type != "viewer" },
            "name": contact.fullname,
            "title": contact.jobtitle OR "",
            "email": contact.email,
            "phone_number": contact.phone_number,
            "signatory": participant_type == "signatory", # Set signatory as boolean
            "sign_method": preferred_sign_method OR "standard_esign", # Default value
            "delivery_channel": preferred_delivery_channel OR "email", # Default value
            "two_step_authentication_method": preferred_two_step_auth OR "none" # Default value
        }

        # Step 8.2: Remove sign method if the participant is not a signatory
        IF participant["signatory"] IS False THEN
            REMOVE 'sign_method' FROM participant

        # Step 8.3: Categorize participants as company or individual
        IF party_type IS "company" THEN
            SET company_id TO contact_company_id[contact['id']]
            IF company_id NOT IN unique_company_ids THEN
                APPEND company_id TO unique_company_ids
            END IF
            ADD company_id TO participant
            APPEND participant TO company_participants
        ELSE
            CREATE individual_party AS:
                - type: "individual"
                - participant: participant
            APPEND individual_party TO parties
    END FOR

    # Step 9: Handle unique company participants
    IF unique_company_ids IS NOT EMPTY THEN
        SET company_parties TO result of SetCompanyParties USING account_connection, unique_company_ids, AND company_participants
        # Merge company_parties list into parties list
        EXTEND parties WITH all items IN company_parties

    # Step 10: Return the final list of parties
    RETURN parties
END FUNCTIONFUNCTION SetCompanyParties(account_connection, unique_company_ids, company_participants)
# Purpose: Build a list of company parties by retrieving company details and associating participants.
# Step 1: Retrieve company details from the user's system
# Note: Ensure this step queries the system using the unique_company_ids and account_connection.
GET Companies USING unique_company_ids AND account_connection
SET result TO companies
# Step 2: Initialize company details
CREATE an empty key-value store named company_details
# Step 3: Populate company details
FOR EACH company IN companies DO
ADD an entry in company_details WITH:
Key: company["id"]
Value: {
"name": company["name"],
"identification_number": company["reg_number"],
"participants": an empty list,
"type": "company"
}
END FOR
# Step 4: Associate participants with their respective companies
FOR EACH company_participant IN company_participants DO
REMOVE "company_id" FROM company_participant
SET company_id TO the removed "company_id" value
ADD company_participant TO the "participants" list IN company_details[company_id]
END FOR
# Step 5: Convert company details into a list of parties
CREATE an empty list named company_parties
FOR EACH key-value pair IN company_details DO
ADD the value (company details) TO company_parties
END FOR
# Step 6: Return the list of company details
RETURN company_parties
END FUNCTIONIn this step, you need to define delivery_channel, sign_method, and two_step_authentication_method for each participant. You can manually assign these values while mapping each participant's data to the Oneflow participants. Alternatively, you can use the default values defined by your end users at the template level.
6
Map Line Items (Products)
Map the line items (products) associated with the deal or opportunity to the Oneflow Product data structure. To proceed with this mapping, ensure that the contract contains at least one product group.
FUNCTION BuildProductGroups(line_items, source_template)
    # Purpose: Transform a list of line items (products) into a format suitable for Oneflow's Public API.

    # Step 1: Verify if the source template supports products
    IF "can_receive_products" IN source_template["available_options"] AND source_template["available_options"]["can_receive_products"] IS True THEN
        SET oneflow_product_group TO the first element IN source_template["product_groups"]
        CREATE an empty list named products_list
        CREATE an empty list named oneflow_product_groups

        # Step 2: Process each line item
        FOR EACH item IN line_items DO
            # Build a Oneflow product
            SET product TO:
            {
                "description": item["description"],
                "name": item["name"],
                "price_1":
                {
                    "base_amount": { "amount": item["price"] },
                    "discount_percent": item["discount"]
                },
                "quantity":
                {
                    "amount": item["quantity"],
                    "type": SELECT one from: "quantity", "single_choice", or "multiple_choice"
                }
            }

            # Add the product to the products list
            ADD product TO products_list
        END FOR

        # Step 3: Create a product group
        SET product_group TO:
        {
            "id": oneflow_product_group["id"],
            "products": products_list
        }

        # Step 4: Add the product group to the list of product groups
        ADD product_group TO oneflow_product_groups
    END IF

    # Step 5: Return the built Oneflow product groups
    RETURN oneflow_product_groups
END FUNCTION- Price Columns in Oneflow: Oneflow provides two price columns (
price_1andprice_2) by default in a product group. These can be utilized as needed. For example, theprice_1column can be used to map standard line items (products), while theprice_2column can be used for recurring line items (products). - Mapping Line Items to Product Groups: The guide above maps line items (products) to one available product group in the template. To map the line items, the template must contain at least one product group.
- Handling Multiple Product Groups: End users can define multiple product groups in a template. In such cases, you can enhance the logic to map line items (products) to the appropriate product group based on their categories.
- Configurable Product Groups: Oneflow allows modifying product group configurations when creating a contract. This flexibility lets users adapt the product group setup to match their requirements.
- Additional Resources: For more details about working with Oneflow products, refer to the Create a contract with products and Contract products tutorials.
7
Create the Oneflow Contract
In this step, you will create the Oneflow contract.
FUNCTION CreateOneflowContract(template_id, workspace_id, counterparties, contract_value, contract_name, product_groups: default null)
    # Purpose: Create a contract in Oneflow using the provided details.

    # Step 1: Prepare the request body
    CREATE body AS a key-value store WITH:
        "template_id": template_id,
        "workspace_id": workspace_id,
        "parties": counterparties

    # Step 2: Add product groups to the body if provided
    IF product_groups IS NOT NULL THEN
        ADD "product_groups" TO body WITH value product_groups

    # Step 3: Add contract name if provided
    IF contract_name IS NOT NULL THEN
        ADD "name" TO body WITH value contract_name

    # Step 4: Add contract value if it is non-negative
    IF contract_value IS NOT NULL AND contract_value >= 0 THEN
        ADD "value" TO body AS:
        {
            "amount": FORMAT contract_value TO two decimal places
        }

    # Step 5: Set up the headers for the API request
    DEFINE HEADERS
        SET "x-oneflow-api-token" IN HEADERS TO user.apiToken
        SET "x-oneflow-user-email" IN HEADERS TO user.email
        SET "Content-Type" IN HEADERS TO "application/json"

    # Step 6: Make the API request to create the contract
    SET response TO POST REQUEST TO "{host}/v1/contracts/create" WITH:
        - JSON body
        - SSL verification
        - HEADERS

    # Step 7: Check the response status code
    IF response.StatusCode EQUALS 200 THEN
        SET jsonResponse TO result of parsing response to JSON format
        RETURN jsonResponse
    ELSE
        THROW HttpResponseError
END FUNCTION
Note:The person creating the contract (i.e., the user whose email is set in the
x-oneflow-user-emailheader) will automatically be assigned as the contract owner.
8
Upload Attachments/PDFs
In this step, you will learn how to upload user-selected attachments/PDFs to the contract. Currently, Oneflow does not support uploading files during contract creation. Therefore, after the contract is created, you must upload the user-selected files to the newly created contract.
FUNCTION UploadContractFiles(user, account_connection, contract_id, selected_files)
    # Purpose: Upload files to the Oneflow contract.

    # Step 1: Initialize lists for attachments and expanded PDFs
    SET attachments TO an empty list
    SET expanded_pdfs TO an empty list

    # Step 2: Process each selected file
    FOR EACH selected_file IN selected_files DO
        # Step 2.1: Retrieve file data from your system
        TRY
            GET file IN binary or base64 format USING selected_file.id AND account_connection
            IF file IS NOT NULL THEN
                IF selected_file.upload_as_expanded_pdf THEN
                    APPEND file TO expanded_pdfs
                ELSE
                    APPEND file TO attachments
            END IF
        CATCH Exception
            HANDLE exception
        END TRY
    END FOR

    # Step 3: Upload attachments if available
    IF attachments IS NOT EMPTY THEN
        SET upload_as TO "attachment"
        # Upload the attachment files to the Oneflow contract
        CALL UploadFileToOneflow WITH user, contract_id, files=attachments, upload_as
    END IF

    # Step 4: Upload expanded PDF if available
    IF expanded_pdfs IS NOT EMPTY THEN
        SET expanded_pdf TO expanded_pdfs[0] # Use the first expanded PDF only
        SET upload_as TO "expanded_pdf"
        # Upload the expanded PDF file to the Oneflow contract
        CALL UploadFileToOneflow WITH user, contract_id, files=expanded_pdf, upload_as
    END IF
END FUNCTIONFUNCTION UploadFileToOneflow(user, contract_id, files, upload_as)
# Purpose: Upload a file to a specific Oneflow contract.
# Step 1: Prepare the URL
SET url TO "https://api.oneflow.com/v1/contracts/{contract_id}/files"
REPLACE {contract_id} IN url WITH the provided contract_id
# Step 2: Prepare the headers
CREATE headers AS a key-value store
SET "x-oneflow-api-token" IN HEADERS TO user.apiToken
SET "x-oneflow-user-email" IN HEADERS TO user.email
SET "Accept" IN HEADERS TO "application/json"
SET "Content-Type" IN HEADERS TO "multipart/form-data"
# Step 3: Prepare the body for the request
CREATE body AS a key-value store WITH:
"upload_as": upload_as
# Step 4: Make the POST request
SET response TO POST REQUEST TO url WITH:
- data: body
- headers: headers
- files: files
# Step 5: Handle the response
IF response.status_code IS NOT 200 THEN
THROW HttpResponseError WITH response.error_message OR "Failed to upload file to Oneflow"
END IF
END FUNCTION
Note:The Oneflow Public API currently allows uploading attachments to a single attachments box and expanded PDFs to a single PDFs box. End users can include a maximum of one attachments box and one PDFs box in the template. Multiple boxes of either type will result in an error, and only one PDF file can be uploaded to the PDFs box.
9
Fetching the Final Contract Data
In the final step, you can return the contract ID to your frontend. From there, the frontend can fetch the complete contract data from Oneflow. Alternatively, after uploading the files, you can retrieve the final contract data on the backend and return the complete contract information to the frontend. Use the Get a contract by ID endpoint to fetch a contract by its ID from Oneflow.
Updated 10 months ago